How to create a quickly create a Spark Cluster for free?
Set up a local spark cluster in 2 commands using Docker Compose

Are you a developer, data scientist, or student looking to harness the power of Apache Spark without the complexity of a full-scale cluster?
This tutorial will guide you through creating a local Spark cluster using Docker, streamlining your development process and reducing overhead.
Why use Docker for a local Spark Cluster?
- Develop and test locally: Run Spark jobs on your machine without a full-scale cluster.
- Simulate production environments: Mirror real-world settings for consistent development and deployment.
- Learn and experiment: Set up a functional Spark environment to practice big data processing techniques.
By leveraging Docker volumes, we’ll ensure your data and configurations persist, making your local cluster a robust tool for continuous development and testing.
Let’s dive in and discover how Docker can make working with Spark easier and more efficient!
Prerequisites
Before we dive into setting up our local Spark cluster using Docker, ensure you have the following prerequisites :
- Docker: you need Docker installed and running on your machine. You can download it from Docker’s official site.
- Basic knowledge of Docker and Spark: Familiarity with Docker commands and a basic understanding of Apache Spark will help you follow this tutorial more effectively, even if running the commands will just work.
Why use a non-root container?
Non-root container images add an extra layer of security and are generally recommended for production environments. However, because they run as a non-root user, privileged tasks are typically off-limits.
Configuration
Custom Docker image
Create a new file named Dockerfile with the following content:
# Use the bitnami Spark image as it comes pre-configured with necessary Spark components
FROM bitnami/spark:latest
# Add a user to run the application
RUN useradd -ms /bin/bash spark
# Create directories for data and jobs
RUN mkdir -p /data/inputs /data/outputs /jobs
# Set the ownership of the directories to the spark user
RUN chown -R spark:spark /opt/bitnami/spark /data /jobs
# Set the user to run the application
USER spark
We create and set up a new user named spark to run the application to ensure that the container runs as a non-root user.
It’s a good practice to run containers as non-root users to enhance security and reduce the risk of privilege escalation attacks. For example, if a container is compromised, the attacker will have limited access to the host system.
Start the cluster
Docker Compose is a tool for defining and running multi-container Docker applications. It uses a YAML file to configure the application’s services, networks, and volumes, making it easier to manage and scale your application.
Environment variables Customizable environment variables
- SPARK_MODE: Spark cluster mode to run (can be master or worker).
- SPARK_MASTER_URL: Url where the worker can find the master. Only needed when spark mode is worker.
Create a new file named docker-compose.yml with the following content:
services:
  spark-master:
    build:
      context: .
    container_name: spark-master
    hostname: spark-master
    networks:
      - spark-network
    ports:
      - "8080:8080"
      - "7077:7077"
    volumes:
      - spark-inputs:/data/inputs
      - ./data/outputs:/data/outputs
      - ./jobs:/jobs
    environment:
      - SPARK_MODE=master
  spark-worker:
    build:
      context: .
    hostname: spark-worker
    networks:
      - spark-network
    environment:
      - SPARK_MASTER=spark://spark-master:7077
      - SPARK_MODE=worker
    volumes:
      - spark-inputs:/data/inputs
      - ./data/outputs:/data/outputs
      - ./jobs:/jobs
networks:
  spark-network:
    driver: bridge
volumes:
  spark-inputs:
This configuration file defines two services: spark-master and spark-worker, each running the custom-spark image. The spark-master service runs in master mode, while the spark-worker service runs in worker mode and connects to the spark-master service.
To start the Spark cluster using Docker Compose, run the following command:
docker-compose up -dThis command starts the Spark cluster using the configuration defined in the docker-compose.yml file.
To start only the master, you can use the command:
docker-compose up -d spark-master
To start only the workers, the number of workers you want to start, you can use the command:
docker-compose up -d --scale spark-worker=2
This command starts two worker nodes in the Spark cluster.
Running a Spark Job
- Prepare folder structure
Create the following directories to store the inputs, outputs, and job scripts:
mkdir -p ./data/inputs ./data/outputs ./jobs- Create the script
We’ll create a simple PySpark script that reads the Iris dataset, performs a basic data manipulation, and writes the results back to the spark-data volume.
Create a new file named spark_job.py with the following content:
from pyspark.sql import SparkSession
# Initialize Spark session
spark = SparkSession.builder.appName("IrisDataProcessing").getOrCreate()
# Read the dataset
df = spark.read.csv("/data/inputs/iris.csv", inferSchema=True, header=False)
# Rename columns
columns = ["sepal_length", "sepal_width", "petal_length", "petal_width", "species"]
df = df.toDF(*columns)
# Perform a basic data manipulation: calculate average sepal length by species
avg_sepal_length = df.groupBy("species").avg("sepal_length")
# Write the results back to the Docker volume
avg_sepal_length.write.csv("/data/outputs/avg_sepal_length_by_species")
# Stop the Spark session
spark.stop()- Getting the data
Let’s download the Iris dataset from the UCI Machine Learning Repository or any other source you prefer.
wget https://archive.ics.uci.edu/ml/machine-learning-databases/iris/iris.data -O data/inputs/iris.csv
- Copy the data and the script to the cluster
Input data: Copy the Iris dataset to the Spark master container.
docker cp data/inputs/iris.csv spark-master:/data/inputs/iris.csvThat’s the output you should see:

PySpark script: we don’t need to copy the script to the master container, we can just move it to the jobs folder that is already mounted to the master container.
cp spark_job.py .jobs/spark_job.pyVerifying Data Accessibility To verify that the data is accessible, you can start an interactive session within the Spark master container:
docker exec -it spark-master ls /data/inputs /jobsInside the container, list the contents of the /data/inputs and /jobs directory to ensure the dataset is present.
You should see this output:

Job Execution
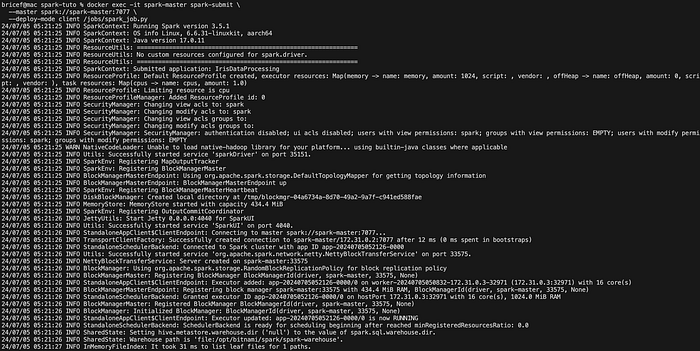
Execute the script using the Spark master container:
docker exec -it spark-master spark-submit \
  --master spark://spark-master:7077 \
  --deploy-mode client /jobs/spark_job.py
This command runs the PySpark script on the Spark cluster, reading the dataset from the volume, processing it, and writing the results back to the volume.
The output should look like this:
Once the job is finished, you can check the results:
docker exec -it spark-master ls /data/outputs/avg_sepal_length_by_speciesYou should see the output files in the avg_sepal_length_by_species directory.

The output files contain the results of the Spark job, showing the average sepal length by species. You can display the contents of the output files to view the results:
docker exec -it spark-master cat /data/outputs/avg_sepal_length_by_species/part-00000-9b270837-872e-4a34-bb5b-4cb6d52044be-c000.csvWarning: The output file name may vary depending on the Spark job execution. Replace part-00000–9b270837–872e-4a34-bb5b-4cb6d52044be-c000.csv with the actual file name in your output directory.
Tips and Tricks
- Alias the spark-submit command: To simplify running Spark jobs, you can create an alias for the spark-submit command. For example, you can add the following line to your .bashrc or .bash_profile file:
alias spark-submit='docker exec -it spark-master spark-submit --master spark://spark-master:7077 --deploy-mode client'With your cluster up and running, if you run the command:
spark-submit /jobs/spark_job.pyIt will execute the Spark job on the cluster without needing to specify the master URL each time.
Stopping the Cluster
To stop the Spark cluster, you can use the following commands:
docker-compose down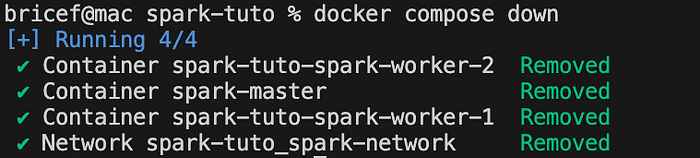
Setting up a local Spark cluster using Docker can streamline your development process, enabling you to test Spark jobs, simulate production environments, and experiment with Spark features in a controlled environment.
By using Docker volumes, you can ensure that your data and configurations persist across restarts, making your local cluster a robust tool for continuous development and testing.
This approach is beneficial not only for Data Engineers but also for Data Scientists who work with Scala or PySpark. It allows for incremental development without heavily utilizing resources from a real cluster on any cloud platform, as it was the case in my previous job.
You can find the entire code there.

